Welcome to Day 3 of Refashionista. Today our guest is Delia of Delia Creates. I adore Delia. Her blog feels like entering a comfortable, warm home. It’s full of beautiful ideas, gorgeous pictures, and she has two adorable boys! (She’s also got a little girl on the way.) If you haven’t been to her blog before you need to check it out. She’s awesome.

Hi, I Am Momma readers! I am thrilled to be here today.
Cheri’s blog is full of wonderfully creative inspiration for crafting, for motherhood, and for life. So I’m pretty honored to be her guest today!

I love re-purposing projects because you get to take something useless to you and make it useful again…or maybe even something you love. 🙂
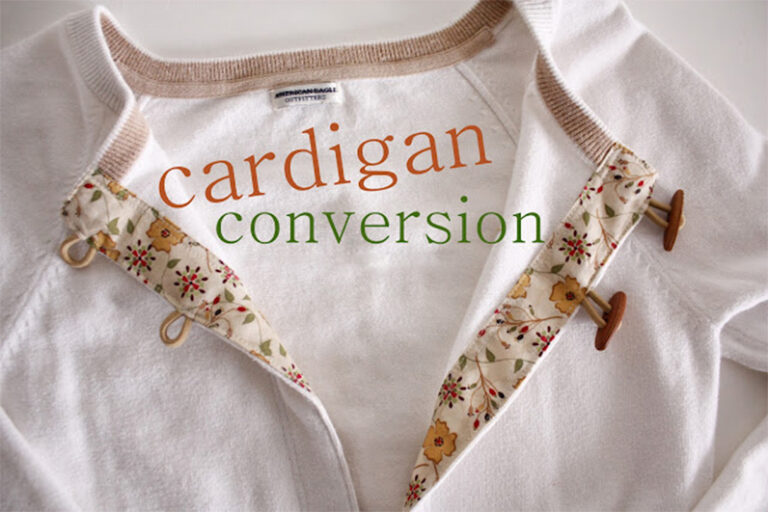
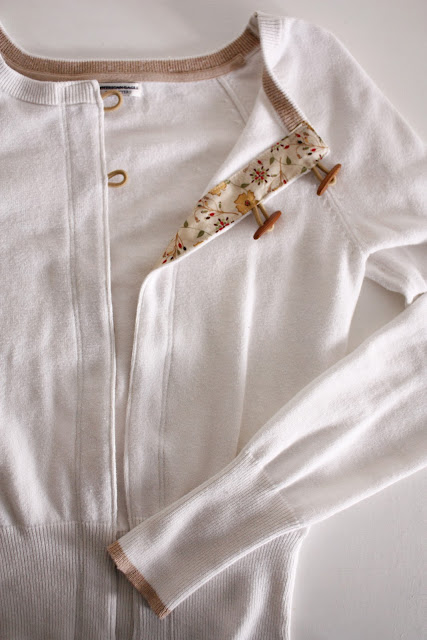
Such is the case with some too tight, too short sweaters I had, that I converted to cardigans. With most cardigans, you have buttons that line the length of it so you could technically wear it as a blouse if needed.
With these cardigans, because they are starting out as too tight and too short sweaters, there are only two to three buttons that clasp the cardigan partially closed. This is how I wear most of my cardigans anyway…so it works!

This idea is really simple, but I provide some tips and detailed methods to help you achieve a durable, beautiful outcome.
Materials:
You just need two strips of matching or complimentary fabric, about 2 inches wide and at least 2 inches longer than the length of your sweater down the middle. A cute fat quarter will work for many sweater lengths and give you plenty of fabric. If you want your cardigan to clasp close you will also need some buttons, or toggles and some elastic.
The matching thread looks best…but as you’ll see I didn’t for two of my cardigans. You use so little thread with this project…and I’m cheap. 🙂
Let’s begin.
1. MAKE SURE you pre-wash your fabric. This is an absolute must. If you skip this step, the fabric will shrink, and pucker and pull on the sweater in unattractive ways when you wash it.
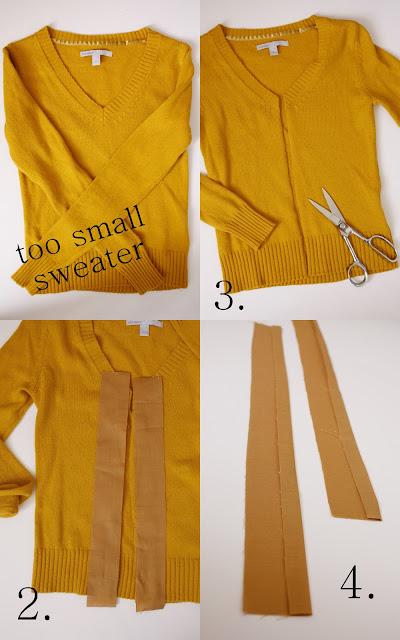
2. Measure and cut your fabric strips. Two inches wide and at least two inches longer than the length of your sweater down the middle.
3. Cut your sweater down the middle. I made some faint marks with a ruler and pencil to make sure I cut it nice and straight. *Be careful not to stretch your sweater as you measure and cut.
4. Iron one long side of your fabric strips under about 1/4 of an inch.
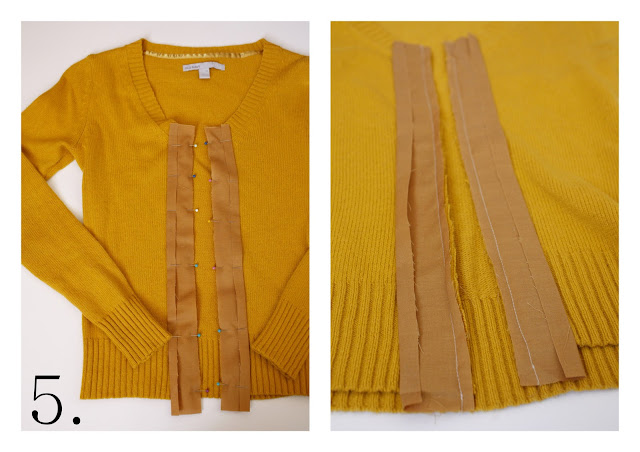
5. Pin and sew the fabric strips to the cut portion of your sweater. You want the right sides together. The side with the fabric ironed over is the wrong side. Don’t skip the pinning. Sweaters often stretch and pull. Pinning will help you keep everything even and where it should be.
Also, I highly recommend you increase your stitch length a bit since you are working with sweater knit. It will pull on the fabric less, create more even stitches with no skipping…just a good idea. You probably should also use a ballpoint needle made for knits…but I didn’t. I just used a universal needle with an increased stitch length.
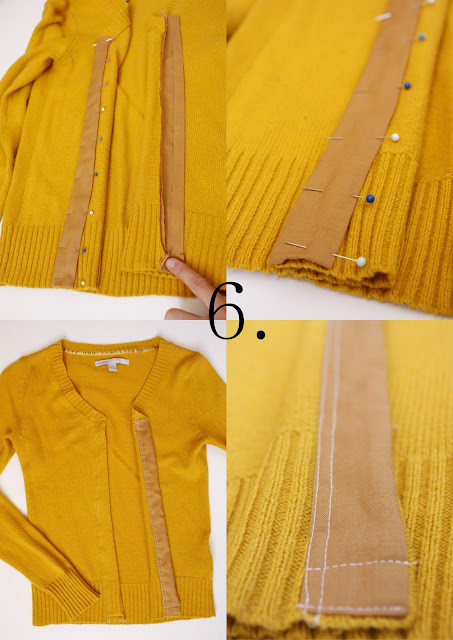
6. Flip the fabric strip over and fold under each side of the sweater/cardigan. Fold the top and bottom portions under as well. Pin {don’t skip this} and sew. You can sew near the inside seam, or not. I didn’t for this one but did for others.
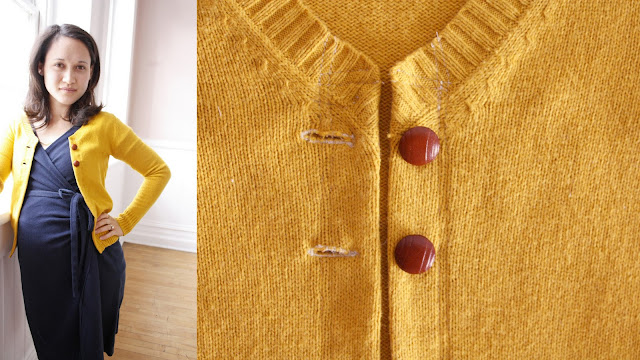
7. Last step! 🙂 You can just leave it as is, or add buttons. Remember what I said about increasing your stitch length? Well…I should have done it with my button holer too. I didn’t with this yellow cardigan and the button holer kept breaking my thread, stretching my fabric and ended up giving me less than desirable results.
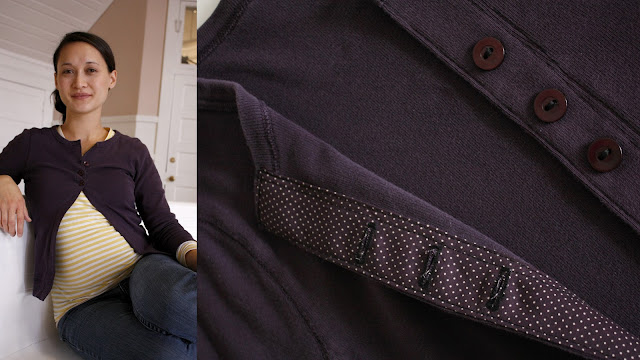
I increased my stitch length as much as I could with this purple cardigan and achieved MUCH better results. This is also a thick knit shirt, instead of a sweater knit, so that might have helped too.
Don’t know how to use a button holer? This tutorial from MADE or this one from Grosgrain can help you. I learned from the Grosgrain one because I have a Brother sewing machine like Kathleen.

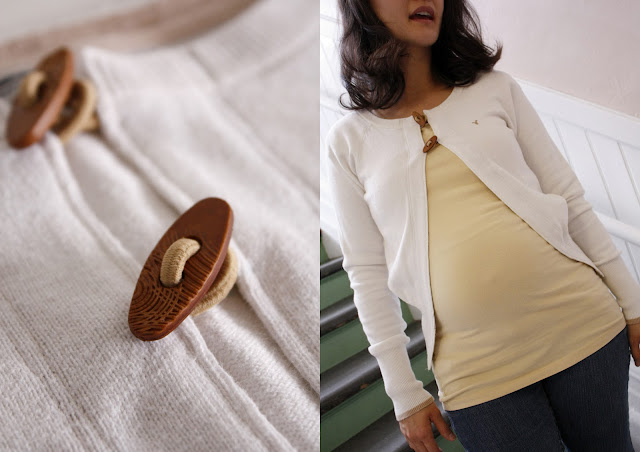
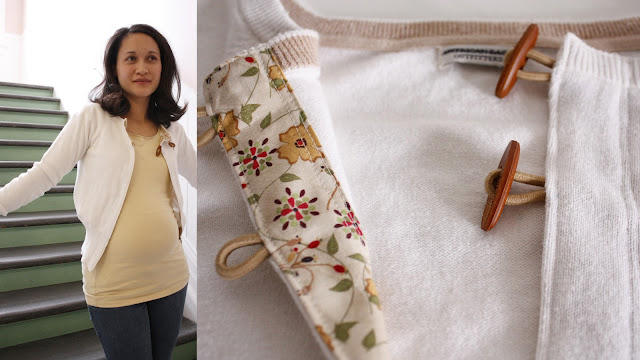
For this tan cardigan I put in toggles. I just picked up some toggles in the buttons/notions aisle at Jo-Ann and snagged some tan ponytail holders from Walmart. For my sweater I only needed two ponytail elastics, half of one elastic for each loop.
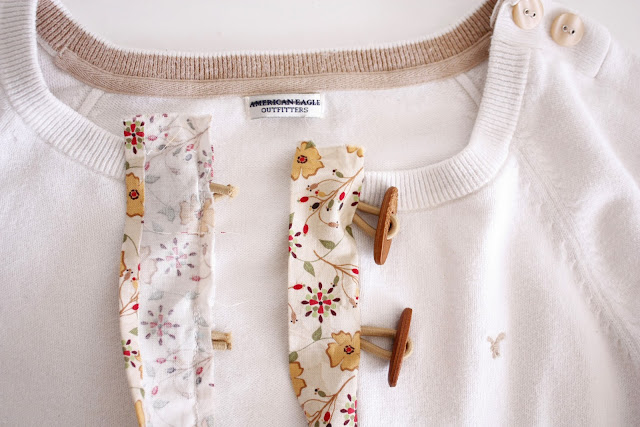
At step 5, just sandwich the elastic in between the fabric strip and sweater and sew it in. Make sure to go back and forth over it a few times to strengthen the seam where the toggles are. It can be fussy to get the elastic sewn in initially, but with a little patience it turns out quite nicely.
I also topstitched over the inside seam when I was done, to strengthen the seam and toggles even more.
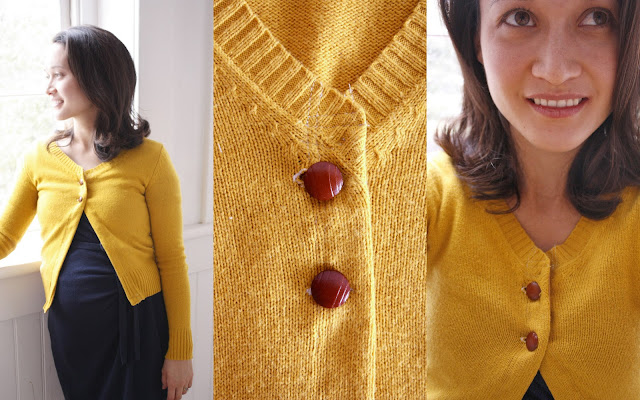
And now, I have three cardigans I love…
…instead of three sweaters/shirts, I was going to give away.

Bonus…I don’t have to worry about them fitting over my ever growing belly either. 🙂

P.S. If you’re wondering how these wash. I just washed mine and they did great. Just remember to follow original washing instructions for the sweater you re-fashioned. Depending on what fabric you choose to line the inside with, you might need to re-press it after each wash. I used cotton and I didn’t have to do any pressing.
Thanks for having me over Cheri!
Happy Re-fashioning!
Thank you SO much for such a clever, practical idea. I’m sure we all have a few shirts or sweaters that could use this tutorial. Thanks for reading.