Are you trying to find an iPad Mini Case for your Kids to keep their iPad safe for damage? In this review, we have picked many different types of mini iPad cases and compared them to find out which one is the best for kids.
We picked based on what we thought an iPad should handle and ones that are ideal for kids to use for everyday purposes.
With all the benefits of Apple’s world-renowned build quality and intuitive user interface, parents buying an iPad for their kids can be sure that their little ones will be up and running with their new toy in no time.
Introduced in late 2012, it’s no wonder that the Mini iPad has become incredibly popular with parents looking for an affordable and suitably-sized piece of tech for their kids. Boasting all the functionality of the full-sized version, this device will keep them entertained for hours on end with games, art packages, and even the occasional educational app.
That said, kids can be tough on their toys, so you’re going to need a kid proof iPad mini case. There are a lot of iPad mini child case solutions on the market, so it helps to have a clear idea of what to look out for. Smart parents will want to choose an iPad cover for their kids’ device which both looks fun and funky, and is robust enough to withstand all those inevitable bumps and mishaps.

Considerations When Buying a Tablet Cover
So, with the above considered, you need to make sure that the iPad cover you purchase for your kids looks good enough for them to not want to rip it off at the first opportunity. You’re also going to need to think about what material is used in the construction of the case you choose for your toddler or child. It’s got to both absorb potential shocks and provide a protective barrier, so thick EVA rubber or silicone can work well.
Plastic cases are also great for both boys and girls, however it must be solid enough not to crack under heavy use. Also, kids can be clumsy, so some kind of textured surface is always a good bet. With all that in mind, here is our rundown of the top iPad mini cases for boys and girls on the market today.
Best iPad Mini Cases for Kids in 2024
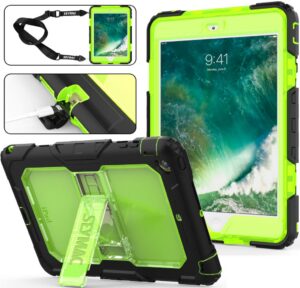
1. Shockproof Rugged Mini 1/2/3 Case
If you’re looking for a bright and funky iPad case with a rugged look, tough exterior, and a ton of useful features, the Shockproof Rugged Mini 1/2/3 case is a smart choice. Constructed using robust thermoplastic polycarbonate and anti-skid silicone, it is both solid and comfy in the hand. The black and florescent green color scheme is eye-catching so your kid’s device won’t get left behind as you’re rushing around between play dates, and it even comes with a handy strap for easy carrying. There’s also an integral stand, and all control buttons are easily accessible.

2. Handbag Tablet Case
Prefer a daintier look for your iPad cover? Then the Handbag Tablet Case from GEMWON could be exactly what you’re looking for. The magnetic button closing mechanism means that the kid-proof case will keep your tech safe and secure, and the elegant styling in gorgeous pink and tan is sure to delight the little missy in your life. It also features a clever hands-free stand system, durable straps, and a useful front pocket. All controls can be accessed efficiently, and a camera hole is also included so all those selfies and impromptu photos will be a breeze.

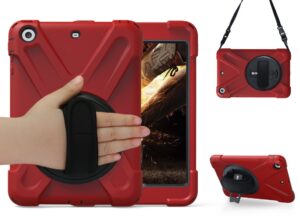
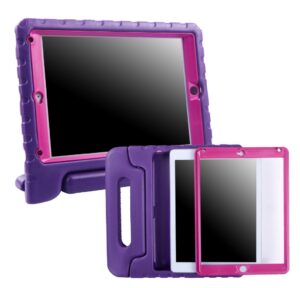
3. Braecn 3 Layer Shockproof Case
Available in a range of colors, the Braecn 3 Layer Shockproof Case provides the ultimate in protection for your child’s tablet. The ingenious rotating handle and strap with adjustable velcro fixings incorporates a neat stand, and the included strap is a great added bonus. Add to this the unique three layer construction and a watertight seal and you’ve got a formidable protection solution for your tablet. Be aware, however, that this case is only compatible with the Mini 1, 2, and 3, so if you’re looking for a iPad Mini 4 case for kids this isn’t the one for you.
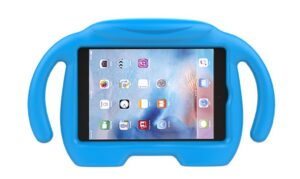
4. TopES iPad Cover with Handles
Need an iPad Mini case with handle for the little racing car driver in your life? Then the TopES Tablet Cover with Handles could be just what you’ve been searching for. The curved silicone handles make this case look just like a car’s steering wheel, so they can pretend they’re speeding around the race track while you’re driving them from A to B. Featuring tempered glass for the ultimate in screen protection, it also has a useful strap which will hang neatly off the back of your car seat. What’s more, your child can choose from the wide range of available colors.

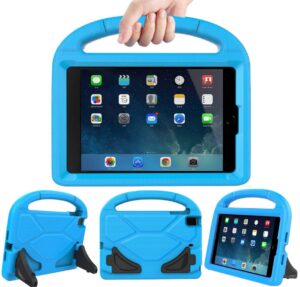
5. Ledniceker Convertible Kids Case for iPad
Sometimes simplicity is the best choice, which is why you should definitely consider the Convertible Kids Case for iPad from Ledniceker. Featuring bold design and a chunky handle, this is a great option for parents looking for a fun and highly protective iPad Mini toddler case. Your child’s device will be encased in thick foam on all sides (barring the screen of course!), and the tough rear stands will be able to withstand whatever use and abuse your little one can throw at them. To top it all off, this surprisingly economical solution is available in a range of bright colors.
6. Butterfly Protective Case
All little girls love butterflies, so if you’re looking for an iPad Mini 2 kids case the Butterfly Protective Case from Xboun is certain to be a safe bet (and not just in terms of the superb protection it will provide for your child’s treasured tablet). It’s available in a whole load of fun colors, and those beautiful butterfly wings even double up as a useful stand. The thick silicone will easily withstand shocks and bumps, and the clever design maintains optimal accessibility for all those essential controls. This case is compatible with Mini iPads 1 – 3.

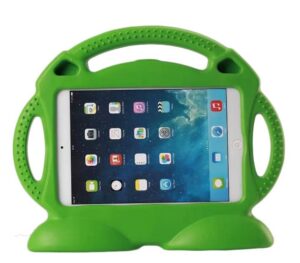
7. Ledniceker Case for Mini 1 – 5
The Lednicer Case for iPad has one obvious advantage over many of its competitors, namely that it is compatible with all models from 1 through to 5. But the features boasted by this excellent tablet case don’t end there. The chunky side handles, ‘feet’ style stand, and smiling design feature give it a fun, characterful appearance, and thick foam construction will provide the ultimate in protection for your child’s device. With precise cutouts for all controls, an amazing range of color choices, and impressive online reviews, this is certainly the iPad Mini cover for kids to beat.
8. Shockproof Bumper iPad Case
Featuring a unique two piece design and constructed using heavy duty EVA foam, the Shockproof Bumper iPad Case from HDE is another great option for parents looking for a durable cover for their kid’s device. All controls and the camera lens are easily accessible, and the screen protector can be removed for super fast touch screen operation. The range of colors will provide something to suit all tastes, and an exceptional online review track record will give you added peace of mind. All in all, a wise choice which will help your child’s iPad to survive for many years.
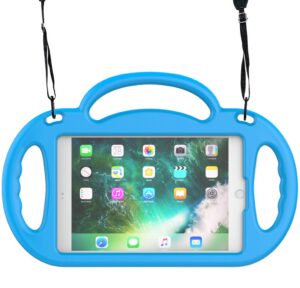
9. Tirin Case with Lanyard
Another highly characterful option, the Tirin Case with Lanyard features a lovable robot design on the rear side whose legs and feet double up as a sturdy stand. With integral EVA handles providing great ergonomics and incredible protection for your child’s device, a tough lanyard for easy carrying, and the essential precise control cutouts, this really is a fun iPad case for kids which your child is bound to love. Available in an impressive range of colors including black, blue, green, orange, purple, red, rose, and turquoise, the Tirin Case with Lanyard is simply out of this world!
10. HCHA Case for Apple iPad 1 – 4
Utilizing the familiar three handle format, the HCHA Case for Apple Mini iPad 1 – 4 is constructed from non-toxic, hazard-free EVA foam. The handles feature heavy grips to ensure that your child’s tablet cannot easily be dropped, and wide ‘feet’ stands make ‘tumbling iPad’ incidents extremely unlikely. Other features include a friendly face design built into the protective back panel of the case, precise cutouts to allow quick and easy access to the device’s camera lens, control buttons, and charging point, and a range of available color options which includes; black, blue, green, pink, purple, red, and rose.
11. Pzoz Silicone Bear Case
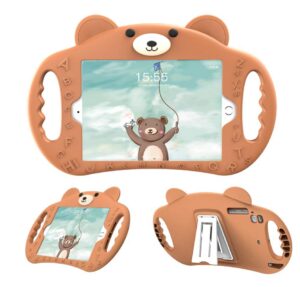
Teddy bears have been incredibly popular with children for longer than anyone could possibly remember, so the Silicone Bear Case from respected manufacturer Pzoz is certain to be a favorite among girls and boys alike. Decorated with the alphabet to add an educational element to the design, and blessed with a cute, lovable face, this lightweight iPad cover is complete with a stand, useful side handles, and precise cutouts. Providing reliable protection for your child’s device, the case is available in brown and pink versions, and is compatible with all Mini iPad models from 1 through to 5.
Overall Best iPad Mini Case for Kids
While all of the kid’s tablet covers detailed above could be an ideal choice, if pressed to pick one we’d go for the Ledniceker Case for Mini iPad 1 – 5. It’s compatible with the widest range of models available, and the quirky styling just looks fantastic and is sure to appeal to girls and boys alike. Add to that the attractive selection of colors, and fail-safe thick foam construction, and you’ve got an unbeatable protective tablet case.
What are the Different Styles of iPad Cases?
Cases for your child’s iPad are available in a wide variety of different styles. EVA foam cases are a popular option, as are thinner, more lightweight silicone cases. In terms of format, your iPad case for kids might have integrated handles, a flip out or permanent integral stand, or an attached fabric lanyard or carry strap. Whichever style appeals most to you, it is wise to give some thought to the way in which your child uses their tablet prior to making your final purchasing decision.
What are the Benefits of Using a Tablet?
Used sensibly and under close parental supervision, a tablet can help your child to develop vital reasoning skills. While modern interfaces are highly intuitive, it is still necessary to use trial an error in order to gain a clear understanding of how to access all those fun games, TV shows, and other features.
So although it might not seem like it at the the time, your child will be learning constantly as they get to know how to operate their tablet. Additionally, streaming apps enable parents to monitor and regulate their kid’s TV viewing by restricting which shows (and how many) their kids can watch.
In fact, many teaching programs recommended by schools are available as apps which parents can download for their kids to use on their tablets. Unlike old-fashioned workbooks, these learning aids can be taken absolutely anywhere with ease, and you don’t have to worry about them getting drawn on or torn to pieces!
What are the Potential Risks of Using a Tablet?
While – if used sensibly – tablets can be an excellent educational tool for your kids, they are not without their downsides and disadvantages. Screen glare is an issue, so be sure to take advantage of daylight display settings, and make sure that your child has not altered this setting without your knowledge. Similarly, ensure that the volume level is kept to a sensible level. This will both protect your child’s hearing and prevent too much disturbance to others.
Chief among the potential risks of using a tablet for your child, however, is the ever-present threat posed by the internet. Your child should only be allowed to go online under strict supervision by you or another adult whom you trust.
Keep your kid’s iPad offline whenever they have an opportunity to use it without close supervision, and remember that kids can often be far more tech-savvy than us adults might imagine. For example, they’re likely to have no qualms about logging on to a neighbor’s unsecured network. So check if there are any available, and if so consider either installing an app to mask these networks or approaching neighbors to request that they establish password protection.