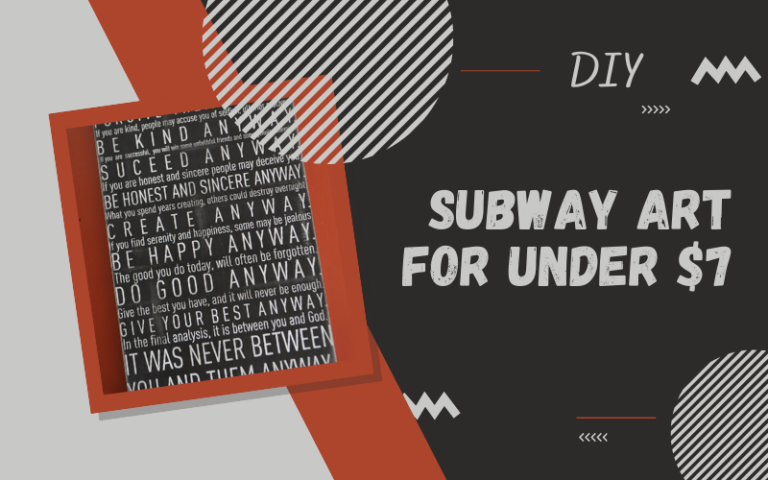
Remember when I made the giant newspaper article for Rex's room? Well, ever since then I've wanted to do a Subway art version, using the Mother Teresa quote I love.
Believe it or not, this giant 2'x3' art cost less than $7. Sweet, huh? Well, let me walk you through it so you can make it yourself.
First of all I got on Picnik and created my jpeg file. For a full tutorial on how to create your own printable, click HERE. You'll want to start with a pretty high resolution photo. You want to make sure to crop it as a 4"x6" because the ratio is the same when you print it as a 2'x3'. I spent a fair amount of time getting the quote just right.
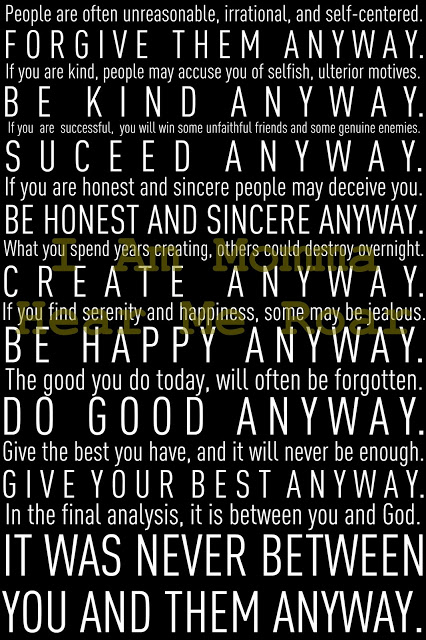
Next, you print it at Staples as an "engineer blueprint." This is important. Why? Because it will only cost you $2.99 to print it this way. The only downside is that it's black and white, so if you're looking to do something colored this won't work. I wanted mine black and white, like original subway art. (Staples web site often has uploading problems when ordering online, so I recommend bringing your file in on a zip drive or calling the store to get their email address to send it to rather than uploading it to their site.)
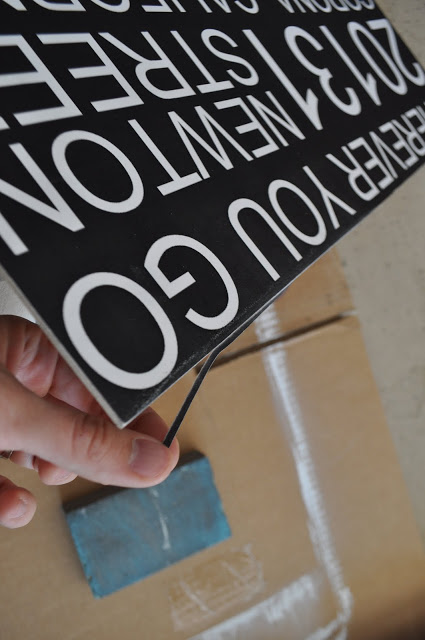
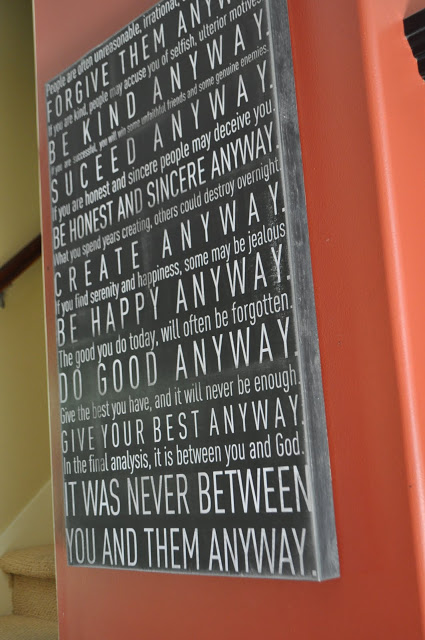
This picture is of a different one I made for my sister. The big blob is me blocking out her current address.
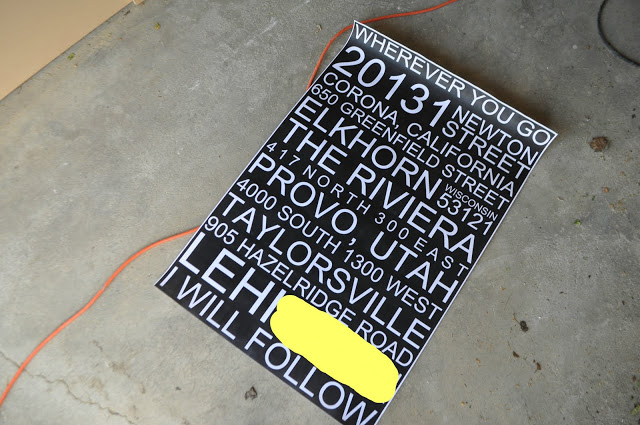
Okay, next step. At Home Depot they have a really large sheet of super thin MDF for under $4. The MDF sheet won't be the exact same size as your printed art, which means you can either cut the MDF yourself OR ask them to do it. They usually cut things for free. WARNING: Print your art FIRST, then measure it, then ask them to cut it to that measurement. Why? Because the art work doesn't print all the way to the edge, which means it's not exactly 2'x3'. You don't want the wood to be larger them the paper.
You can kind of see the border along the edges in the picture above.
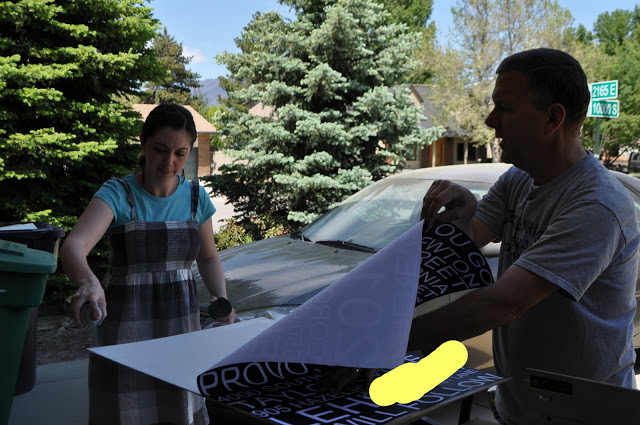
Next, you glue the paper onto the wood. I have used a couple different types of spray glue for this and the one that worked the best for me was Elmer's. Since you want to get the paper positioned perfectly, let me show you a trick my dad taught me. Place the paper exactly where you want it. Have someone hold one end in place and roll up the other end. Spray your glue like crazy and then roll that half down. I don't have a brayer. (I think that's way it's called.) Instead I used a dust broom to smooth the paper down all over (starting in the middle first). Then roll up the other half and do the same. Make sure to get a lot of glue on the edges.
If your paper isn't exactly flush with the wood you can fix that as you sand it. It will start to wear it down until it's easy to rip off.
I sanded mine a lot on the edges and some on the inside because I wanted mine to look really aged. You can sand the paper itself and the toner will start to wear off. It works well (though you'll get a bit dirty and you'll have to dust off the board when you're done).
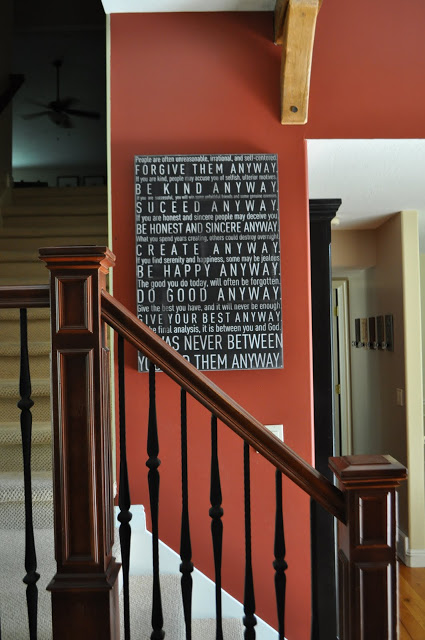
Once your paper is on, you may choose to mod podge the top. I didn't. When I did Rex's sign I felt like it made the edges ripple a bit, so I didn't do it this time. I've had it on my wall for a couple of weeks now and it seems to be just fine without.
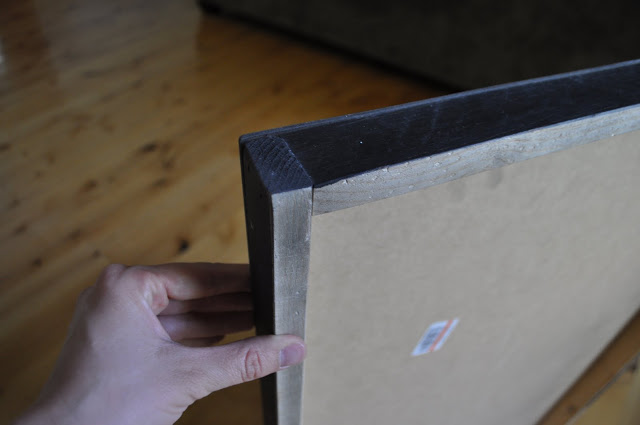
My dad was kind enough to pull out some scrap wood from the garage and put a frame along the edges, making it look like one thick board. He did this before I glued on the paper, so that he could use a nail gun to attach the boards easily. Then the paper concealed the nails. I also painted the edges black before adding the paper. My dad built a regular frame around the one I made my sister, which was pretty as well. (Sorry, no picture yet.)
If you don't want to add a frame, you hang it as is. I would drill a small hole through the board and nail it right to through to a stud. It's too thin to hammer those little hanging strips into. OR, you could skip the MDF all together and buy a poster frame for the art.
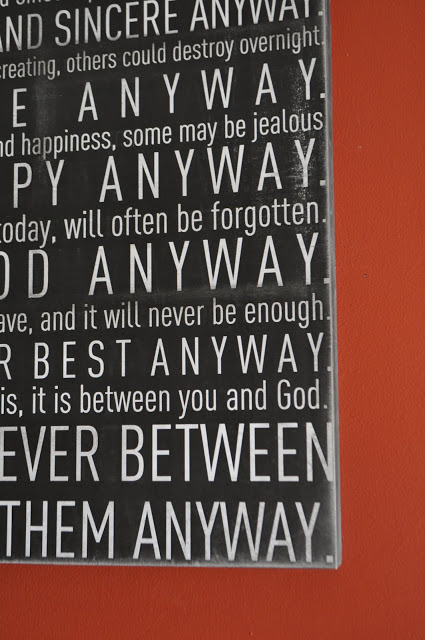
I am really excited to finally have this quote up in my home. I love it.
If you happen to want my exact art/file and don't want to spend forever making your own, I just listed it in my shop HERE for $3.50 (and it won't have the "succeed" misspelled like mine :)
Thanks for dropping in. See you tomorrow.
EXTRA INFO: If you don't want to build your own canvas to use the quote check out THIS POST for another way to print and use the files.


Love it! I actually did something SO similar last month. I want to make more b/c they are addicting. :) Check it out!
ReplyDeletehttp://lilmoptop.blogspot.com/2011/06/family-tree-subway-art-tutorial.html
I absolutely LOVE it!! LOVE LOVE LOVE. but...(you spelled succeed wrong) I hated to point it out..but you might want to correct it for your etsy listing.
ReplyDeleteI love this project. It looks so cool.
ReplyDelete(On another note, I just wanted to let you know that you can see the address you blurred out in a different picture.)
I LOVE LOVE LOVE what this says!
ReplyDeleteAMAZING! It looks fantastic. Great job!
ReplyDeleteI love the quote and this project, I am going to have to try it.
ReplyDeleteLove it! I've made one for my livingroom with family rules :) VERY similar to yours. Great for the kids to look at everyday, lol <3
ReplyDeleteI love this so much! I think this quote is perfect. I checked your store and it isn't listed right now so I will check back later :)
ReplyDeleteSuch a great idea!!!
ReplyDeleteThose are really cool. It's artsy AND reinforces a positive message - a great combination :)
ReplyDeleteBlessings,
This Good Life
LOVE, Cheri. What an awesome idea to have it printed as a blueprint!
ReplyDeleteI spray glued posters to $1 foam board from Michaels for an event (wood would be good for home; foam worked great for the event), and it was easier than I thought it would be! I was so nervous that I was going to mess up that first poster that had to be in color and glossy (i.e. expensive!). Anyway, your project looks great and is inspiring!
ReplyDeleteOh! Way cute! These would be so cute in my kids' rooms. Cute!!
ReplyDeleteI've always loved this quote. What a fantastic way to display it! I've got a slew of sibling's anniversaries coming up...this would make a great gift!!!
ReplyDeleteI. Love. This. I think I will make one for my classroom and one for my house. So cool. Thanks for sharing it!
ReplyDeleteWell, you just keep on amazing me. I love this so much. Thanks for the super cute idea.
ReplyDeleteWhat a great quote. I had forgotten about it. Thanks for reminding me.
ReplyDeleteThis is awesome! I love the quote and and the artwork! Thanks so much for the tutorial!
ReplyDeleteWow! I want to make one NOW! I think I am going to try the super hero newspaper for my son's birthday party next month - Great ideas!!!
ReplyDeleteAWESOME!!! I love the way it turned out and the quote.
ReplyDeleteI LOVE this! I headed over to your etsy shop to buy the file, but it is no longer available...Could you PLEASE make it available again???
ReplyDeleteNooooo the file is gone, please bring it back please.
ReplyDeleteIt is one of my favs, I have it in my office! I love your tho mine is much smaller.
ReplyDeleteI love this quote and I love your design for it. Great job!
ReplyDeleteReally awesome. I love subway art, and quotes...I could never choose just one - that would be my problem!
ReplyDeleteGreat tutorial.. thanks for sharing! I have the perfect saying that I was hoping to incorporate into my home decor.
ReplyDeleteI lover that quote and the subway art! Thanks for sharing the steps!!!
ReplyDeleteThis is one of my husband's favorite quotes. It looks so neat how you arranged it.
ReplyDeleteWould love to buy a copy of your file once you get it back in your shop! Keep us posted! I LOVE this quote!!!
ReplyDeleteThat is amazing! I have been trying (and failing) to find a way to put some lyrics to Amazing Grace in my house, and now I can succeed!!!! YEA!!!!!
ReplyDeleteThis is absolutely AMAZING! I SERIOUSLY LOVE IT! I can't wait to pick out something I want to do for myself! Also, just a thought...they have those command strips that could hang it if you don't do the frame. I, however, LOVE it with the frame and plan to do that! Thanks so much for sharing!
ReplyDeleteLove this idea! I think I may try it using our family values.
ReplyDeleteI love this quote! Thank you for sharing! I would love to make a printable using it. Would that bother you?--connie, measuredbytheheart.com
ReplyDeleteI LOVE it!!
ReplyDeleteThank you for the awesome tutorial!
xoxo
Lori
This is so awesome! I'm stalking your etsy store to order one :) Thanks!
ReplyDeleteI Looooooove this! Thank you :o)
ReplyDeleteI love the quote that you used, it is so inspiring, and it looks fab mounted like this. I might give it a try! Thanks for the inspiration x
ReplyDeleteI LOVE this! Bought me one and blogged about it at thecraftersfilebox.com. Thanks for sharing!!
ReplyDeleteLove that quote! If I had a wall in my house to put that, I totally would!!!! Awesome!
ReplyDeleteLove it! I would love for you to stop by http://diyhshp.blogspot.com/ on Monday to link up your project and any other projects you would like to share.
ReplyDeleteI love it! Although, succeed is spelled wrong, whoops!
ReplyDeleteI do love this, although succeed is spelled wrong. I had to double check it though because I was confusing myself from staring at it too long
ReplyDeleteHi Cheri, this is so beautiful.The only problem I'm running into is that at Staples when I download for engineering prints it comes up at $48.00, is any one else having these issues, any tips?
ReplyDeleteThanks!
Luana - If it's charging you that much must you must have uploaded it to the wrong section. Make sure you're in "engineer blueprint" by following the steps I mentioned in the email. First click on copy and print. Then choose signs and banners, then choose engineer prints. After uploading your image it'll let you pick the size from a drop down menu and you'll pick 24"x36". Then the price should be $2.99. If you're still having problems drop me an email and I'll do it online for you.
ReplyDeleteGood luck!
Cheri
I'm having the same problem as Luana. :( When I follow the directions it ends up being $42 or $48 depending on the paper I pick. Bummer!
ReplyDeleteI have the same problem. It defaults to color and won't let you change it to b&w, and the cost is $42 or $48. I wonder if we don't have the same (cheap, blueprint only) type of printer that your Staples has, and that it treats everything as a color printout?? I tried all of our local Staples with the same results.
ReplyDeletei'm having the same problem with pricing. i made a format and it says $48? i'm going to try it again.
ReplyDeletetried it again and it's not working! did anyone's problems get resolved?
ReplyDeletei figured it out. i just called the store. i explained the situation and she told me to just write a note in the special notes section and she'd take care of it. very easy. and... it's ready! i'll hav eto share a link of my finished product. i used one of my favorite quotes reminding me to be present in the every day.
ReplyDeleteThere have been a few of you having the same problem and I got online and saw the same thing. SO, I called Staples this morning and asked it the Engineer Blueprint price had changed and they said no. I explained the problem and she didn't know why it was happening, but you can call them and work it out (like Tessa did above) with them or just bring in the file on a drive instead of doing it via the internet. Sorry for the inconvenience. I'm not sure why the web site is doing that. Apparently it's charging you for color, but ti won't let you choose black and white. Anyhow, I hope this helps!
ReplyDeleteCheri
Thank you for your post! You were our blog fav of the week!
ReplyDeletehttp://www.ourlittlegems.com/
We love your site!
Emily
Can anyone tell me if this is done on photo paper or bond paper? I placed my order through staples on photo paper and I am not sure if that was correct?? I have a little time before they print to let them know if it should be different--any advise?
ReplyDeleteSHUT THE FRONT DOOR. This will sound like crap but I've been dragging my feet on making some subway art, just the jolt I need. Yes please.
ReplyDeleteI picked mine up yesterday...perfection. I was too anxious to mount it so I just taped it to the wall.
ReplyDeleteThey must have use a whole cartridge of ink to print that background ....and all for $2.99.
Thanks Cheri....doing a post on it on Monday and sending people your way.
xo jana
I picked mine up yesterday...perfection. I was too anxious to mount it so I just taped it to the wall.
ReplyDeleteThey must have use a whole cartridge of ink to print that background ....and all for $2.99.
Thanks Cheri....doing a post on it on Monday and sending people your way.
xo jana
Love this!! The files are all out in your etsy shop and I would love to buy one!
ReplyDeleteBrook
I just ordered my blueprint. I used the lyrics to the song my husband and I danced to at our wedding. Just FYI, you can't have blueprint's shipped from staples. They cancelled my order. The directions for doing this were great so far! I can't wait to see how it turns out. This would be a great gift idea for newly weds.
ReplyDeleteI love the font! What font did you use?
ReplyDeleteI absolutely adore this project! Also am a big fan of the quote...what's not to love? Thanks for the inspiration! Great blog!!
ReplyDeletethe kiddos & i finished ours today. it has lots of "character" in it thanks to their help. thanks so much for the wonderful creation idea!!
ReplyDeleteIt just worked online for me. Thanks for the tips!
ReplyDeleteHello, I want to make one of these but do not have a staples do you know if office max or office depot do these? Thanks!
ReplyDeleteLove this and as someone else posted, I am using my wedding song. My question is what type of sandpaper did you use? I bought 2 (just in case) and used one to test and the sandpaper I was using was leaving scratch marks and not looking as yours does. Thank you in advance!
ReplyDeleteBeth
Beth- You want a really fine sandpaper. Pick one that's not really gritty, but smoother. That should do the trick. Good luck!
ReplyDeleteCheri
Thanks so much for this tutorial! I've wanted to make one for so long and now I've found the look I love.
ReplyDeleteWhat font did you use? I really like the look of it!
skyeolson@gmail.com
This comment has been removed by the author.
ReplyDeleteI went to your etsy shop but it wasnt there for me to purchase. Did you take it down? Id rather buy yours than spend forever making my own, thanks!
ReplyDeleteFabulous project :-) Would like to buy your text but it is not for sale at your shop. Can you please put one up . . . I'll check by later on today :-) Thanks Sue Nicholson . . . please don't email me at my google account . . . I rarely pick it up.
ReplyDeleteYay!!! I just purchased your file from your Etsy store! I cant wait to do this project. I have the perfect spot for it!!!
ReplyDeleteThanks :)
Tona Haggermaker
Athens, Alabama
I was trying to buy your file but it's no longer available. Did you take it down or am I blind?
ReplyDeletethanks!
Is your file no longer available? If it is, could you please send me the link to purchase it? Thank you!
ReplyDeleteHi Momma! I am wondering since you share about how to make printable, do you mind if we recreate this and share it on our own blog? I love this but need it in a 16x20 instead. So while creating it I thought why not share. If you totally hate that idea though i wont. Let me know your thoughts.
ReplyDeleteI finally got around to printing mine yesterday, it was completed SAME day ($3). MDF in these parts (PA) was $6 and I bought some framing trim, that was another $4. So far mine is around $13 but I'm still really excited for it, it's ginourmous. Just painted the framing and came in quick to make sure I was doing everything just right. Thanks for the inspiration, Cheri.
ReplyDeleteCan you relist your file on etsy? Id love to purchase it! Thanks!
ReplyDeleteI am with Melanie, can you re-post the file? I would like to purchase it as well. If you wouldn't mind send me and email when it is posted again I would appreciate it. My email address is korbie1227@gmail.com.
ReplyDeletethanks
i just tried this today and i love love love the results. thanks so much for posting.
ReplyDeleteI love Mother Teresa! God rest her soul. I am going to make this for my house. Thanks for the great post!
ReplyDeleteThanks so much for the detailed instructions! I have been wanting to make one of these for my husband for a few years, and your ideas are a great easy (and affordable!) way to make it. I have a problem with mine that I hope you can help with! I uploaded a high quality photo, made it 2x3 inches, covered it with black, and added all of my words. However, when I upload it to Staples it shows up in the center of the 3x6 feet rectangle, and if I click scale to fit, it makes everything blurry. Do you have any ideas or tips for me? Thanks so much!!!
ReplyDeleteMichelle - If you plan on printing this through Staples let me give you a couple of recent tips. Their web site has had a lot of issues lately and it completely lowers the resolution of your print so I recommend printing this one of two ways:
ReplyDelete1) Call your local store. Then can give you an email address to send the file to. Just tell them you want it printed as a 24"x36" engineer blueprint.
2) Save the file to a jump drive and take the drive in to Staples for them to print from.
Thank you for the tips! I will try that today!
ReplyDeleteI uploaded mine as a "engineer Blueprint" and showed a $2.99 total. But the next morning I got a call from my Staples that they couldn't print this as a "blueprint" because that is for line drawings and there would be shadows and banding...blah, blah, blah. They said if I wanted to print it I would have to print it as a "color copy" (even though its B & W?!?!?) and it would be $48.99! Yikes! Any other suggestions of where to print it since my Staples isn't wanting to work with me?!? I have my frame all ready, just waiting to print! I LOVE this so much and thank you for your support of the charity!
ReplyDeleteCandice - You can ask them to try it and tell them you'll purchase it even if it doesn't look perfect. Otherwise Office Depot does Engineer Blueprints as well. They are a little harder to find online though. Out of hundreds of people who've printed this quote, only two had a problem with it not printing well and it was because that particular Staples had a really old printer. I hope that helps.
ReplyDeleteCheri
This comment has been removed by the author.
ReplyDeleteThank you so much for the excellent instructions. They were easy to follow and I have a piece of art hanging in my house that I absolutely love. Really really nice job! Sharon
ReplyDeleteI love this so much! Not only do I love the subway art and how yours turned out, plus the $7.00 price tag but the quote is one of my favorites! Thank you for the awesome tutorial! t.xoxo
ReplyDeleteI recently made this, thanks to your awesome tutorial! It was just as easy and pleasing as you said it would be! Thank you. I love it.
ReplyDeleteI made this for my home and I love it! Mother Teresa is a huge inspiration to me and I have always loved this quote. I just took my jpeg on a thumb drive to my local Staples and they printed it in minutes as an engineer blueprint. $2.99 is a steal! I did have some problems with bubbling so I may redo it and try making it again. Thanks so much!
ReplyDeleteThank you so much for you step by step instructions. I made his and EVERYONE has complimented me on it. Unfortunately I didn't have any scrap wood so the cost was a bit more but worth every penny. You ROCK!
ReplyDeleteMy print is coming out to $42. anyone know what I may be doing wrong?
ReplyDeleteBrenda,
ReplyDeleteI think if you read the two comments I've posted in the comment section it will answer your question.
Thanks!
Cheri
Wow, this is so simple and amazing! Love it! Thanks so much for sharing this!
ReplyDeleteI purchased all my supplies for the project but my print from Staples came out much lighter. I asked if they could make it darker but that didn't happen. I am going to add some distress ink to the edges. I hope it works.
ReplyDeleteI can't wait for the finished piece. BTW don't send the link to Staples if you have a Mac. I had to convert the file to Jpeg.
Thank you for sharing this great project.
This is awesome! I made my design for the play room and sent to staples. They called and said that it would come out somewhat "pixely" because I"m going from a small picture to a super sized print. Is this normal or is everyone getting a solid, un-pixeled, print? Thanks!!! :)
ReplyDeleteAmy - If you read all my comments above I think you'll have the answers. You probably need to start with a larger file size and DON'T send it to them through their web site. Read my instructions above.
ReplyDeleteThanks!
Cheri
Thank you so much for posting this! This is an AMAZING tutorial! I made my first one today, it came out great!
ReplyDeleteThanks so much for the great directions! Check out mine, with props to iammommahearmeroar, at http://pseudomestics.blogspot.com/
ReplyDeleteThanks for posting this tutorial. How heavy is this artwork when you add the frame on the back? THANKS!
ReplyDeleteWe used pretty lightweight, thin wood to create the frame so it's still really light. I only use a small nail in the wall to hold it - not an anchor or anything fancy.
DeleteCheri
I love everything about this project! great job!
ReplyDeleteOk, so I have a potentially dumb question...lol Is it possible to downsize this to make a smaller version?
ReplyDeleteTo keep the proportion and not crop words out you would have to reduce it to a 4x6, but that would be pretty small to try and read. Sorry!
DeleteCheri
This comment has been removed by the author.
ReplyDeleteI love Mother Teresa, and I can't wait to make this. Blessed Teresa of Calcutta, pray for us.
ReplyDeleteHey All! So Just an FYI - I apparently can't read because I did not follow Cheri's advice and mine didn't turn out as planned. I went on iPiccy and created my .jpeg image, but then I was SO excited and proud of myself that I just went on the the Staples website and uploaded it last night. Then today I went to pick it up and it was all fuzzy and pixally. They guy told me to go ahead and email the file to him...so I did and they are supposed to figure it out. He told me the same information though, that you should email or bring the file in. DON'T make my mistake - DON'T upload to Staples!!! Yeah, so excited to pick up the clearer copy tomorrow. Thanks so much for the awesome tutorial Cheri!!
ReplyDeleteThis comment has been removed by the author.
ReplyDeleteI absolutely love this, - as I do play around with images in Adobe Elements and LOVE my grandchildren I went to town mixing this up with poems, inspiration and their lovely wee selfs: GREAT! Thank you so much!
ReplyDeleteKind regards from Eva Mari in Norway :)
PS: Had to edit my first post: typo... ;)
Post about the outcome: http://evamaris.blogspot.com/2012/05/bargain-xxl-printsblueprint-to-rescue.html
I tried this project with two different things. The first was a photo of my family, and the second was the file 'powerful' that I bought from your site. First I went to Office Depot to request an engineers blueprint. The guy basically said that he could not do that because of the ink involved to make my pictures, whereas a blueprint is just lines. He told me that he would have to charge me a price based on square ft, around $35. I told him I would go to Staples. Then I went to Staples, thinking "What if this doesn't work?" But it did! The girl did it with no problem. Both came out great, of course the family photo is not a gorgeous crisp, clear photo that you would professionally order, but I knew it wouldn't be. I just have to get some MDF, or plywood if we have some around the house, and get to glueing!
ReplyDeleteAs a single father and my Son being 4, stumbling along your site Cheri has already increased my creativity to spend more bonding time...until "girls" come into his life..haha.
ReplyDeleteCheri - the website that you suggested we use is no longer in service. Is there another site you would recommend to upload a picture and then start the process? I have a ton of ideas based on this blog post and just not sure where to go now to begin. Thanks! Kelly
ReplyDeleteYES! I recommend pic monkey.com for this. You can see a whole post about other options here:
Deletehttp://www.iammommahearmeroar.net/2012/04/picnik-funeral.html
I made this about a year ago, and it turned out great. But now, a year later, the paper is completely peeling away from the wood. I tried Mod Podge, but it causes it to be way too wrinkly! Any suggestions?
ReplyDeleteHmmmm.....honestly I haven't had this problem. I used mod podge on one I did a long time ago and it's come up on the corners, but I used straight spray adhesive on the subway version it's held really well. Can you pull up the paper a bit where it's coming up and spray some adhesive under it? Or maybe rubber cement would work better if you can't get the spray adhesive under there? Sorry it's peeling up on you! Those are my suggestions, but I haven't had to fix mine, so I can't often any first hand advice.
DeleteCheri
Picnik is no longer....any suggestions on how to do this now? Thanks! Kim sunflwrgrl412@yahoo.com
ReplyDeleteWhat a wonderful project. I purchased the blueprint on your shop and my husband helped me with the frame. Thanks so much for your work on this. I love the quote. Thanks again. Liz
ReplyDeleteCan you do a.different color other than black? Thanks!
ReplyDeleteYou could do white with black lettering, but if you want to print it as an engineer blueprint it's only black and white. You'd pay a LOT more to print it in color at that size.
DeleteYour sister really lived in Elkhorn, WI? I thought I was reading it wrong at first! Small world! Can't wait to try this...
ReplyDelete- Kristin (from Elkhorn, WI)
Hi if we buy it from your shop can we change it at all? I really need a white background with black lettering and didn't know if we could change it once you sent it to us or not. Hope that makes sense. If not I will definitely be trying to make one with your suggestions!
ReplyDeleteThank you so much for showing us how to do this. Thank you so much to the other posters who gave suggestions and warnings and tips.
ReplyDeleteReally appreciate it. When I make ours, I'll post a link!
I'm sure they didn't come out as nice as yours (we had some framing and glue issues), but thank you so much for making the file available and for the tutorial. Excited to give this out this year as our family gift!
ReplyDeleteI just followed your advice and completed 2 black and white photos for our dining room and 1 color art piece for our daughter's room. I am so glad that I ran across this post!
ReplyDeleteThe only problem I ran into was with the color piece. I wanted to use pink for the frame and I was not successful with the final outcome. I will paint over it in the near future, but any advice would be greatly appreciated!
Thank you.
http://connecthomeandyard.com/2013/01/22/inexpensive-artwork-2/
Fyi, the quote was also put to song, google The Roche sisters, they did a beautiful CD right after 9/11, and this song, Do Good Anyway is my absolute fav...The whole CD is very moving and poignant...thanks for sharing this post, I love the idea and plan on also attemtping it!
ReplyDelete